
説明するレイアウト一覧
本記事では以下のレイアウトを説明します。
| VBox クラス | 垂直にUIコントロールを配置 |
| HBox クラス | 平行にUIコントロールを配置 |
| FlowPane クラス | 平行にUIコントロールを配置(折り返し有り) |
| BorderPane クラス | 上下・左右・中心の位置にUIコントロールを配置 |
| GridPane クラス | 行と列を指定してUIコントロールを配置 |
| TilePane クラス | クリッド状にUIコントロールを配置 |
| StackPane クラス | 重ねてUIコントロールを配置 |
コピペで実行する場合の注意点
この記事で紹介するコード内では、「Google Guava」というライブラリを利用しています。
コピペで実行する場合は、「Google Guava」を導入してください。
導入方法は下の記事が分かりやすいです。
Google製のJavaライブラリ「Guava」を使ってみよう (1) |
導入しない場合には、各リストの取り扱いの部分を以下のように修正して下さい。
-import com.google.common.collect.Lists;
+import java.util.ArrayList;

-List<Button> buttonList = Lists.newArrayList();
+List<Button> buttonList = new ArrayList<>();
Java - ネットのプログラムが実行できない|teratail
各レイアウトの説明
VBox クラス
垂直にUIコントロールを配置します。
上部から順に配置されていきます。

import com.google.common.collect.Lists;
import javafx.application.Application;
import javafx.geometry.Insets;
import javafx.geometry.Pos;
import javafx.scene.Scene;
import javafx.scene.control.Button;
import javafx.scene.layout.VBox;
import javafx.stage.Stage;

import java.util.List;

public class VBoxExample extends Application {

    @Override
    public void start(Stage stage) throws Exception{
        stage.setTitle("HBox Example");

        List<Button> buttonList = Lists.newArrayList();
        for (int i=0; i<5; i++) {
            buttonList.add(new Button(Integer.toString(i)));
            buttonList.get(i).setPrefWidth(80);
        }

        VBox vBox = new VBox();
        vBox.setAlignment(Pos.CENTER);
        vBox.setPadding(new Insets(10, 10, 10, 10));
        vBox.getChildren().addAll(buttonList);

        stage.setScene(new Scene(vBox));
        stage.show();
    }
}
UIコントロール間に間隔を空けることも可能です。
VBox vBox = new VBox();
vBox.setAlignment(Pos.CENTER);
vBox.setPadding(new Insets(10, 10, 10, 10));
vBox.setSpacing(5.0); // 追加
vBox.getChildren().addAll(buttonList);

HBox クラス
平行にUIコントロールを配置します。

import com.google.common.collect.Lists;
import javafx.application.Application;
import javafx.geometry.Insets;
import javafx.geometry.Pos;
import javafx.scene.Scene;
import javafx.scene.control.Button;
import javafx.scene.layout.HBox;
import javafx.stage.Stage;

import java.util.List;

public class HBoxExample extends Application {

    @Override
    public void start(Stage stage) throws Exception{
        stage.setTitle("HBox Example");

        List<Button> buttonList = Lists.newArrayList();
        for (int i=0; i<5; i++) {
            buttonList.add(new Button(Integer.toString(i)));
            buttonList.get(i).setPrefWidth(80);
        }

        HBox hBox = new HBox();
        hBox.setAlignment(Pos.CENTER);
        hBox.setPadding(new Insets(10, 10, 10, 10));
        hBox.getChildren().addAll(buttonList);

        stage.setScene(new Scene(hBox));
        stage.show();
    }
}
HBox同様に、UIコントロール間に間隔を空けることも可能です。
HBox hBox = new HBox();
hBox.setAlignment(Pos.CENTER);
hBox.setPadding(new Insets(10, 10, 10, 10));
hBox.setSpacing(5.0); // 追加
hBox.getChildren().addAll(buttonList);

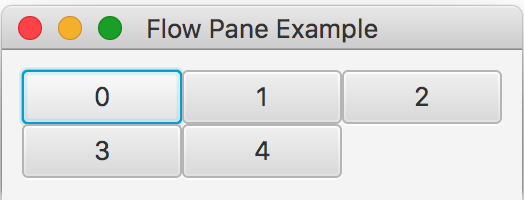
FlowPane クラス
平行にUIコントロールを配置します。
入りきらないUIコントロールは折り返しが行われます。

import com.google.common.collect.Lists;
import javafx.application.Application;
import javafx.geometry.Insets;
import javafx.scene.Scene;
import javafx.scene.control.Button;
import javafx.scene.layout.FlowPane;
import javafx.stage.Stage;

import java.util.List;

public class FlowPaneExample extends Application {

    @Override
    public void start(Stage stage) throws Exception{
        stage.setTitle("Flow Pane Example");

        List<Button> buttonList = Lists.newArrayList();
        for (int i=0; i<5; i++) {
            buttonList.add(new Button(Integer.toString(i)));
            buttonList.get(i).setPrefWidth(80);
        }

        FlowPane flowPane = new FlowPane();
        flowPane.setPadding(new Insets(10, 10, 10, 10));
        flowPane.getChildren().addAll(buttonList);

        stage.setScene(new Scene(flowPane));
        stage.show();
    }

}
HBox クラスとの違い
ウィンドウの幅を狭めてみると、2つの違いが分かります。
- HBox :ウィンドウの幅に合わせてボタンのサイズが縮小
- FlowPane:ウィンドウの幅に合わせてボタンが次の行へ折り返し
HBox クラス

FlowPane クラス
BorderPane クラス
上下・左右・中心の位置にUIコントロールを配置します。

import javafx.application.Application;
import javafx.scene.Scene;
import javafx.scene.control.Button;
import javafx.scene.control.Label;
import javafx.scene.layout.BorderPane;
import javafx.scene.layout.VBox;
import javafx.stage.Stage;

public class BorderPaneExample extends Application {

    @Override
    public void start(Stage stage) throws Exception{
        stage.setTitle("Border");
        stage.setWidth(200);
        stage.setHeight(110);

        Button topButton = new Button("Top");
        topButton.setPrefWidth(210);
        topButton.setPrefHeight(30);

        Button leftButton = new Button("Left");
        leftButton.setPrefHeight(30);

        Button centerButton = new Button("Center");
        centerButton.setPrefWidth(160);
        centerButton.setPrefHeight(30);

        Button rightButton = new Button("Right");
        rightButton.setPrefHeight(30);

        Button bottomButton = new Button("Bottom");
        bottomButton.setPrefWidth(210);
        bottomButton.setPrefHeight(30);

        BorderPane borderPane = new BorderPane();
        borderPane.setTop(topButton);
        borderPane.setLeft(leftButton);
        borderPane.setCenter(centerButton);
        borderPane.setRight(rightButton);
        borderPane.setBottom(bottomButton);

        VBox vBox = new VBox();
        vBox.getChildren().addAll(borderPane);

        stage.setScene(new Scene(vBox));
        stage.show();
    }

}
GridPane クラス
行と列を指定してUIコントロールを配置します。

import com.google.common.collect.Lists;
import javafx.application.Application;
import javafx.geometry.Insets;
import javafx.geometry.Pos;
import javafx.scene.Scene;
import javafx.scene.control.Button;
import javafx.scene.layout.VBox;
import javafx.stage.Stage;

import java.util.List;

public class VBoxExample extends Application {

    @Override
    public void start(Stage stage) throws Exception{
        stage.setTitle("HBox Example");

        List<Button> buttonList = Lists.newArrayList();
        for (int i=0; i<5; i++) {
            buttonList.add(new Button(Integer.toString(i)));
            buttonList.get(i).setPrefWidth(80);
        }

        VBox vBox = new VBox();
        vBox.setAlignment(Pos.CENTER);
        vBox.setPadding(new Insets(10, 10, 10, 10));
        vBox.setSpacing(5.0);
        vBox.getChildren().addAll(buttonList);

        stage.setScene(new Scene(vBox));
        stage.show();
    }
}
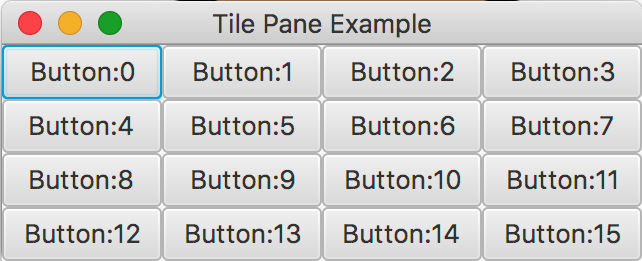
TilePane クラス
クリッド状にUIコントロールを配置します。
import com.google.common.collect.Lists;
import javafx.application.Application;
import javafx.scene.Scene;
import javafx.scene.control.Button;
import javafx.scene.layout.TilePane;
import javafx.stage.Stage;

import java.util.List;

public class TilePaneExample extends Application {

    @Override
    public void start(Stage stage) throws Exception{
        stage.setTitle("Tile Pane Example");
        stage.setWidth(320);
        stage.setHeight(130);

        List<Button> buttonList = Lists.newArrayList();
        for (int i=0; i<16; i++) {
            buttonList.add(new Button("Button:" + Integer.toString(i)));
            buttonList.get(i).setPrefWidth(80);
            buttonList.get(i).setPrefHeight(20);
        }

        TilePane tilePane = new TilePane();
        tilePane.getChildren().addAll(buttonList);

        stage.setScene(new Scene(tilePane));
        stage.show();
    }
}
ウィンドウの縮尺に合わせて配置が変わります。

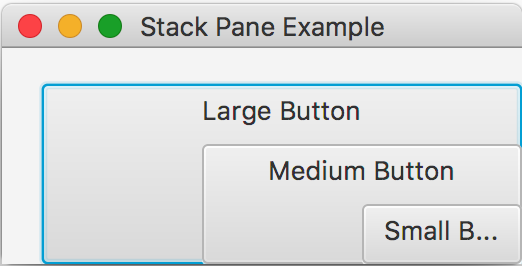
StackPane クラス
重ねてUIコントロールを配置ができます。
import javafx.application.Application;
import javafx.geometry.Pos;
import javafx.scene.Scene;
import javafx.scene.control.Button;
import javafx.scene.layout.StackPane;
import javafx.stage.Stage;


public class StackPaneExample extends Application {

    @Override
    public void start(Stage stage) throws Exception{
        stage.setTitle("Stack Pane Example");
        stage.setWidth(260);
        stage.setHeight(130);

        Button smButton = new Button("Small Button");
        smButton.setPrefWidth(80);
        smButton.setPrefHeight(30);
        smButton.setAlignment(Pos.TOP_CENTER);

        Button mdButton = new Button("Medium Button");
        mdButton.setPrefWidth(160);
        mdButton.setPrefHeight(60);
        mdButton.setAlignment(Pos.TOP_CENTER);

        Button lgButton = new Button("Large Button");
        lgButton.setPrefWidth(240);
        lgButton.setPrefHeight(90);
        lgButton.setAlignment(Pos.TOP_CENTER);

        StackPane stackPane = new StackPane();
        stackPane.setAlignment(Pos.BOTTOM_RIGHT);
        stackPane.getChildren().addAll(lgButton, mdButton, smButton);

        stage.setScene(new Scene(stackPane));
        stage.show();
    }
}
更新履歴
- 2018年 1月 7日 新規作成